The timing belt is a critical component of your car’s engine, ensuring that the crankshaft and camshaft rotate in sync. This synchronization allows the engine’s valves to open and close at the right time, avoiding collisions with the pistons.
When the timing belt breaks or wears out, it can lead to severe engine damage. This guide will walk you through diagnosing a broken timing belt and replacing it step-by-step, using easy-to-understand language.
What is a Timing Belt, and Why is It Important?
The timing belt is a ribbed rubber belt located inside your engine. It connects the crankshaft to the camshaft, which controls the opening and closing of the engine’s valves. A well-functioning timing belt ensures the engine runs smoothly.
If the timing belt breaks, the engine’s timing is disrupted, and the pistons and valves may collide. This can cause significant engine damage, particularly in interference engines, where the valves and pistons share the same space.
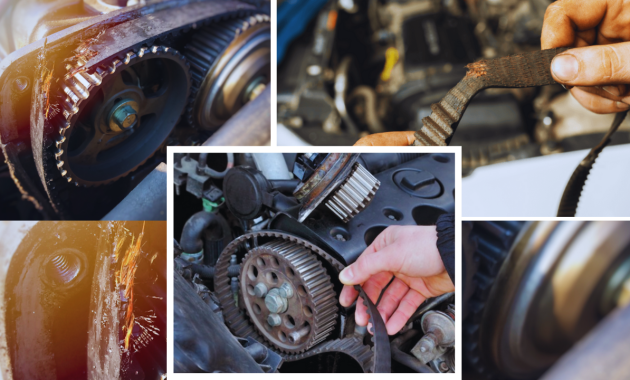
Symptoms of a Broken or Failing Timing Belt
Before replacing a timing belt, you need to confirm it’s the root of your car’s problem. Here are some common signs of a broken or failing timing belt:
1. Engine Misfiring or Difficulty Starting
If the timing belt slips or loses grip, the engine’s cylinders may misfire. In severe cases, the engine might not start at all.
2. Unusual Noises
A failing timing belt may produce a ticking or clicking noise from the engine. This noise indicates the belt is loose or damaged.
3. Oil Leaks Near the Engine
Oil can leak from the timing belt cover if the belt or its components are failing. This can accelerate wear and tear on the belt.
4. Check Engine Light
A malfunctioning timing belt may trigger the check engine light. Use an OBD-II scanner to verify the issue.
5. Visual Inspection
Look for cracks, fraying, or worn teeth on the timing belt. These are clear signs that the belt needs replacement.
What to Do Before Replacing the Timing Belt?
Replacing a timing belt is a challenging task but can be done at home if you’re comfortable working on cars. Here’s what you need to do before starting:
1. Check Your Owner’s Manual
- The manual provides the recommended timing belt replacement interval (usually every 60,000–100,000 miles). It will also show the specific layout for your engine.
2. Gather the Right Tools You’ll need:
- Socket set and ratchet
- Torque wrench
- Screwdrivers
- Timing belt kit (includes a new belt, tensioner, and idler pulleys)
- Jack and jack stands
- Replacement parts, such as a water pump, if applicable
3. Prepare the Work Area
- Work in a well-lit area with plenty of space. Disconnect the car’s battery for safety.
4. Plan for Time
Replacing a timing belt can take several hours, even for experienced DIYers. Make sure you have enough time to complete the task without rushing.
Step-by-Step Guide to Replacing a Timing Belt
Follow these steps to safely replace a broken or worn timing belt:
Step 1: Secure the Vehicle
- Park the car on a flat surface and engage the parking brake.
- Use a jack to lift the front of the car and secure it with jack stands.
Step 2: Remove Engine Covers and Belts
- Disconnect the car’s battery.
- Remove the engine cover and any accessories, such as the serpentine belt, that block access to the timing belt cover.
Step 3: Locate the Timing Belt
- The timing belt is typically behind a protective cover on the side of the engine. Remove this cover using a socket wrench.
Step 4: Align the Timing Marks
- Rotate the crankshaft using a wrench until the timing marks on the crankshaft and camshaft align. This ensures the engine is in the correct position before removing the old belt.
Step 5: Remove the Old Timing Belt
- Loosen the tensioner to release the old timing belt. Inspect the tensioner and pulleys for wear. Replace these components if necessary.
Step 6: Install the New Timing Belt
- Carefully position the new timing belt on the pulleys, ensuring it aligns with the timing marks.
Tighten the tensioner to secure the belt.
Step 7: Double-Check Timing Marks
Before reassembling, recheck that the timing marks are still aligned. This step is crucial to avoid engine timing issues.
Step 8: Reassemble and Test
- Reinstall the timing belt cover, serpentine belt, and other components.
- Reconnect the battery and start the engine to test its operation. Listen for unusual noises or irregular performance.
You May Like To Read: How to Diagnose and Stop a Car from Overheating.
What to Do After Replacing the Timing Belt?
After replacing the timing belt, it’s important to ensure everything is working perfectly. Start by inspecting the area around the timing belt for any oil or coolant leaks, as these could indicate a problem with the installation or nearby components.
Once everything looks good, take the car for a short test drive to check that the engine runs smoothly and there are no unusual noises, such as rattling or ticking.
Finally, over the next few days, keep an eye on your car’s overall performance to confirm the new timing belt is operating correctly and the engine is functioning as it should.
When to Seek Professional Help?
While replacing a timing belt is manageable for experienced DIYers, it’s not for everyone. You should seek professional help if:
- You lack the necessary tools or confidence to complete the job.
- Your engine is complex or has limited access to the timing belt.
- You suspect additional engine damage, such as bent valves or damaged pistons.
Preventive Maintenance for Timing Belts
To prevent unexpected timing belt failures, it’s crucial to stay on top of maintenance. Always replace the timing belt according to the manufacturer’s recommended schedule, as this is key to avoiding costly engine damage.
During routine maintenance, take a moment to inspect the belt for signs of wear, such as cracks or fraying, which can signal it’s time for a replacement. When replacing the timing belt, it’s a good idea to also swap out related components like the tensioner, pulleys, and water pump, as these parts work closely with the belt and can help ensure everything runs smoothly for the long haul.
Conclusion
Diagnosing and replacing a broken timing belt is a crucial task for maintaining your car’s engine health. While the process may seem daunting, breaking it into manageable steps makes it achievable for dedicated DIY enthusiasts.
Always prioritize safety, follow the manufacturer’s guidelines, and double-check your work. With proper care, your new timing belt will keep your engine running smoothly for years to come.


