NewCars-Data.com- Keeping your engine bay clean isn’t just for car enthusiasts—it’s a smart move for anyone who wants to keep their vehicle running well. A tidy engine bay helps you spot small leaks or parts that might be failing before they cause bigger problems down the road.
If you let dirt and grime build-up, you could end up with issues like corrosion, which can harm your engine and shorten your car’s life. Regularly cleaning your engine bay is essential for smooth and safe driving. Think of it as giving your car an “internal car wash,” clearing out the dirt from areas like air intakes, gaskets, and other tricky spots where grime likes to hide.
Are you ready to make your engine shine? Just follow these simple steps to get your engine bay looking like new! It’s easier than you might think, and you’ll be glad you did it.
Pick the right time to Clean Your Engine
To get the best results when cleaning your engine, try to choose a day that’s warm with low humidity and a light breeze. A sunny, pleasant day helps your engine and its parts dry quickly after you clean them, so you won’t have to wait around for ages to see that beautiful, sparkling engine bay.
Plus, working outside on a nice day makes the whole process more enjoyable! So, check the weather before you start, and make sure it’s a great day to give your engine some much-needed TLC.
Set Up Your Gear
Before you dive into cleaning your engine, gather all the tools you’ll need. Here’s a simple list to help you prepare:
- Pressure Washer or Garden Hose: Either one will work great for rinsing off dirt and grime. A pressure washer is powerful, but if you don’t have one, a garden hose will do just fine.
- Microfiber Towels: These are perfect for drying and polishing your engine parts. They’re soft so that they won’t scratch anything, and they’re super absorbent.
- Plastic Bags: Use these to cover sensitive parts, like the air intake or electrical connections. This will protect them from water and cleaning products.
- Degreaser: This special cleaner helps break down tough grease and dirt. Make sure to pick one that’s safe for your engine.
- Soft-Bristle Brushes: These are great for getting into tight spots and scrubbing away dirt without damaging any surfaces. Look for brushes with gentle bristles for the best results.
- VSS Polish: This polish will give your engine that extra shine once it’s clean. It adds a nice finishing touch that makes everything look brand new.
With all your gear ready to go, you’ll be well-prepared to give your engine the care it deserves. Now let’s clean!
1. Let Your Engine Cool Down
Before you start cleaning your engine, it’s really important to make sure it’s cool. If your car has been running, give it some time to cool off. Splashing water or cleaner on a hot engine can create a big mess, and it can even cause damage because of the sudden change in temperature.
Trust me, you don’t want to experience what can happen next—like cracks or other problems that could cost you a lot to fix. So, be patient and let your engine cool down completely before you get started. It’ll save you from headaches later on!
2. Disconnect the Car Battery and Remove the Covers
Before you start cleaning, the first thing you need to do is disconnect your car battery. Start by carefully removing the negative terminal; you can identify it by the minus (-) sign. Once you’ve taken it off, put it in a small plastic bag and tie it shut. This keeps it safe and prevents any accidental contact.
Next, go ahead and remove the battery itself to give yourself more space to work. It’s also a good idea to take off any plastic covers that might be in the way. This will give you a clear view and access to all those tricky spots that need cleaning. Taking these steps ensures you can clean thoroughly and safely!
3. Cover Sensitive Components
Before you get to the cleaning, it’s super important to protect the sensitive parts of your engine from water damage. You don’t want any accidental splashes to mess things up! Start by gently draping a microfiber towel over these parts to provide some cushioning. For extra protection, you can follow up by covering the towel with a plastic bag. This will keep everything safe and dry while you clean.
Here are the key components you should cover:
- Air Intake: This is where the engine gets air, and it needs to stay dry.
- Alternator: This part helps power your electrical system, so it’s important to keep it protected.
- Distributor: It’s essential for your engine’s ignition system, and water can cause issues.
- Battery: Make sure to cover this, especially since you’ve already disconnected it.
- Battery Terminals: These should also be covered to prevent any moisture from causing problems.
By taking these simple steps, you’ll be ensuring that your engine stays safe while you give it a good cleaning!
4. Next: Rinse Away Loose Dirt and Debris
Now it’s time to get rid of the loose dirt and grime before you start the deeper cleaning. If you have a pressure washer, this is the perfect time to use it! Just spray it gently to rinse off all the dirt and any loose debris that has built up.
Don’t worry if you don’t have a pressure washer—using a garden hose works too, although it might not be as powerful. Just remember that a hose might take a bit more time to get everything clean.
As you rinse, make sure to keep the nozzle at least a foot away from any delicate parts. This way, you avoid accidentally damaging anything sensitive. Take your time, and make sure you’ve cleared away all the loose stuff before moving on to the next step!
5. Step five, Apply Engine Degreaser
Now it’s time to apply the engine degreaser! Grab a good degreaser like All Clean+ All Purpose Cleaner & Degreaser, and spray it generously all over the entire engine compartment. Make sure you cover every inch—don’t forget the nooks and crannies where dirt likes to hide!
Once you’ve sprayed it on, let it sit for about 15 to 30 seconds. This gives the degreaser time to soak in and break down all that built-up grease and grime. This step is really important because it makes the cleaning process much easier and more effective. Just be patient and let the degreaser do its magic before you move on to the next step!
6. Scrub Away the Grime and Clean Surfaces
Time to tackle those stubborn, grimy spots! Grab a soft brush and get to work, using the degreaser to break down the caked-on gunk. A great place to start is with the valve covers, as they often collect a lot of dirt.
For larger, flat surfaces, you can use the Wheel and Rim Flagged Tip Brush. It’s designed to make quick work of big areas, helping you scrub away any grime with ease.
When it comes to those tricky, hard-to-reach spots, the Red Rocket Brush is your best friend. Its flexible and bendable design makes it perfect for getting into tight spaces where dirt likes to hide.
And for those fine details, don’t forget about the Boar’s Hair Brush. It’s just right for those tiny areas that bigger brushes can’t quite reach. With all these tools in hand, you’ll be able to scrub away the grime and leave your engine looking clean and fresh!
7. Rinse with Care
Once you’ve finished scrubbing every little nook and cranny of your engine bay, it’s time to rinse off all that leftover cleaner and grime. Use your garden hose or, if you have it, set your pressure washer to a low-pressure setting. This helps ensure you don’t accidentally blast away any delicate parts.
As you rinse, be gentle and take your time to make sure you get all the degreaser and dirt off. Pay special attention to areas where gunk might like to hide. A thorough rinse will leave your engine bay looking fresh and clean, ready for the next steps!
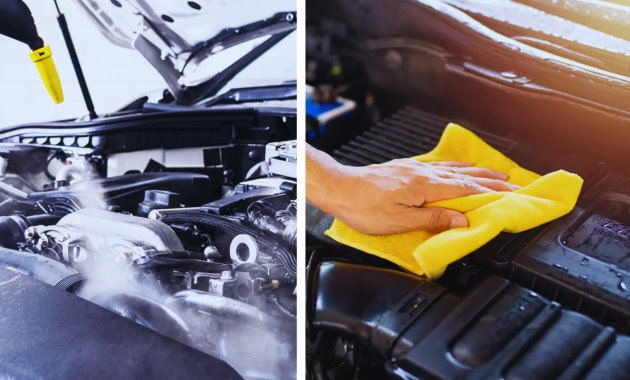
8. Dry the Engine Bay
Now that you’ve rinsed everything off, it’s time to dry the engine bay. Grab a good-quality microfiber towel—these are perfect for soaking up any leftover water and drying the surfaces without scratching anything.
As you wipe down the engine bay, make sure to get into all the corners and edges, leaving everything nice and dry. If you happen to have compressed air available, use it to blow out any water from those tricky hard-to-reach spots. This extra step will help ensure that no moisture is left behind, making your engine bay look great and helping to prevent rust or other issues down the line. You’re almost done, and your engine is going to look amazing!
9. Add Shine
To give your engine bay that final touch, it’s time to add some shine! Grab a water-based dressing like VRP and apply it generously to the various components. This dressing not only enhances the look of your engine but also provides protection, making surfaces look deep and black.
As you apply the VRP, take your time to cover everything evenly. This will help restore that fresh, clean appearance and make your engine bay look almost brand new. The shine will also help repel dirt and grime in the future, keeping your hard work looking good for longer. Enjoy the results—you’ve earned it!
10. Reconnect and Finish Up
Now that your engine bay is looking sparkling clean, it’s time to wrap things up! Start by carefully reattaching the car battery terminals. Make sure they’re secured well so everything works properly.
Next, remove the protective coverings you put on the electrical components earlier. Take your time with this step to ensure everything is back in place safely.
And just like that, your engine bay is all set and ready to go! With your hard work paying off, you can hit the road knowing your engine looks great and is in top shape. Enjoy driving with pride, and remember to keep up with regular maintenance to keep it shining!
So there you have it! A clean engine bay isn’t just about making your car look fantastic; it’s all about keeping it running at its best. Think of it like giving your engine a VIP spa day: scrub it down, rinse it off, and pamper those parts like they’re royalty.
Remember, a clean engine bay equals a happy engine bay. Nobody wants to drive around in a car that looks like a greasy mess! So roll up your sleeves, get in there, and do the job right. When you’re finished, you can drive away knowing your engine is not only clean but also ready to tackle the road ahead like a champion. Enjoy the ride!


