NewCars-Data.com- Upgrading your car’s stereo system can make a world of difference to your driving experience. Whether you’re after better sound quality, more features, or simply a more modern look, installing a new stereo system is a great way to breathe new life into your car’s interior.
But, if you’re new to car audio installations, it can seem like a daunting task. Don’t worry, though—this guide will walk you through the process step by step, using simple language to make it easy to follow.
Why Upgrade Your Car Stereo?
Before we dive into the installation process, let’s quickly talk about why you might want to upgrade your car stereo system. A new stereo can:
- Improve Sound Quality: If your current stereo sounds flat or doesn’t have enough bass, a new system can significantly improve your music experience.
- Add Modern Features: Newer stereos come with features like Bluetooth connectivity, Apple CarPlay, Android Auto, USB ports, and even touchscreens.
- Enhance Your Car’s Interior: A new stereo can give your dashboard a fresh, updated look that complements your car’s style.
Now that we’ve covered the benefits, let’s get into the nitty-gritty of installing your new car stereo system.
What You’ll Need?
Before you begin the installation, make sure you have the following tools and materials:
- New Car Stereo: Of course, the star of the show! Choose one that fits your car and meets your needs.
- Wiring Harness: This is essential for connecting your new stereo to your car’s electrical system. It helps prevent the need for cutting or splicing wires.
- Dash Kit: If your new stereo is a different size from your old one, you’ll need a dash kit to fill in any gaps and make it fit properly.
- Screwdrivers: A flathead and Phillips screwdriver will help you remove screws and panels.
- Socket Wrench: To remove bolts that may be holding the stereo in place.
- Wire Strippers: If you need to trim or strip wires, these tools will come in handy.
- Electrical Tape: To insulate and secure any exposed wires.
- Antenna Adapter: If your car’s antenna doesn’t match the one on your new stereo, you’ll need this adapter to make sure you get radio reception.
A Step-by-Step Guide
Step 1: Disconnect the Car Battery
Before you start working with electrical components, it’s important to disconnect the car battery. This will protect you from accidental shocks or damage to your car’s electrical system.
To do this, locate the car battery, which is usually under the hood or in the trunk, and use a wrench to loosen the nut on the negative terminal. Once it’s loose, remove the cable and set it aside to ensure it doesn’t make contact with the battery.
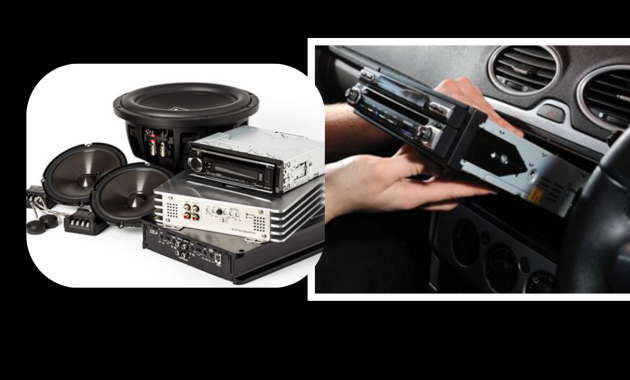
Step 2: Remove the Old Stereo
Now that the power is off, it’s time to take out the old stereo. This step can vary depending on the type of car you have, but here’s a general process:
- Remove any trim or panels: Most stereos are covered by a plastic trim or dashboard panels. Use your screwdriver to gently remove these panels around the stereo. Be careful not to crack or break them.
- Unscrew the stereo: Once the panels are off, you should see screws or bolts holding the stereo in place. Use a screwdriver or socket wrench to remove them.
- Pull the stereo out: Once the screws are removed, gently pull the stereo out of the dashboard. Be careful not to damage any wires behind it.
- Disconnect the wires: Behind the stereo, you’ll find several wires that connect the stereo to your car. These include power, ground, speaker, and antenna wires. Carefully disconnect each wire, remembering where each one goes.
NOTE: It’s a good idea to take a photo or make a note of the connections to make re-installation easier.
Step 3: Install the Wiring Harness and Dash Kit
Now that the old stereo is out, it’s time to prepare your new stereo for installation.
1. Install the wiring harness: The wiring harness is a key part of connecting your new stereo to your car. It’s designed to match your car’s wiring system and make installation simpler. You’ll need to connect the wires from your new stereo to the wires in the wiring harness.
This typically involves matching color-coded wires (for example, red to red, black to black) and securing them with wire connectors or electrical tape. Be sure to follow the wiring diagram included with your new stereo.
2. Install the dash kit: If your new stereo is a different size than your old one, you’ll need a dash kit to ensure it fits properly in your car’s dashboard. The dash kit typically includes a frame that your new stereo will slide into.
Follow the instructions provided with the kit to install it in your car. Once it’s in place, you’re ready to slide your new stereo in.
Step 4: Connect the New Stereo
With the wiring harness and dash kit in place, it’s time to connect the wires to your new stereo. Here’s what to do:
- Connect the wiring harness: Start by connecting the wiring harness to the back of the new stereo. Each wire should click into place easily if you’ve matched them up correctly. If you’re unsure about which wire goes where, refer to the stereo’s manual or use the photo you took earlier.
- Connect the antenna: Don’t forget to connect the antenna wire. If your car’s antenna doesn’t match your new stereo’s connector, use an antenna adapter to ensure you still get radio reception.
- Secure the stereo: Once all the wires are connected, carefully slide the stereo into the dash kit. Make sure it’s secure, and use any screws or bolts that came with the stereo to keep it in place.
Step 5: Reassemble the Dash
Once the new stereo is securely installed, it’s time to put everything back together.
1. Reattach the panels: Replace any trim panels or dashboard pieces you removed earlier. Make sure they snap back into place without forcing them.
2. Reconnect the car battery: Go back to the car battery and reconnect the negative terminal. Tighten the nut with a wrench to ensure it’s secure.
Step 6: Test the New Stereo
Now that everything is connected and reassembled, it’s time to test your new stereo. Turn on the car and check if the stereo powers up. Test the basic functions, such as:
- Volume control: Make sure the volume works.
- Radio: Tune to a station and check if the antenna works.
- Bluetooth/USB: If your new stereo has Bluetooth or a USB port, connect your phone or a USB drive to make sure they work.
Step 7: Final Adjustments
If everything works, great! If not, double-check the wiring connections to make sure everything is in place. You may also need to consult the user manual to adjust settings or troubleshoot any issues.
You May Like To Read: How to check your car’s engine oil level (Step by Step).
Installing a new car stereo system might sound complicated at first, but with the right tools and a little patience, it’s a manageable DIY project. By following this guide, you should be able to upgrade your car’s audio system and enjoy better sound and modern features in no time.
Remember, always take your time, and if you ever feel unsure, don’t hesitate to consult a professional. Happy listening!


