NewCars-Data.com- Replacing your car’s radiator might sound intimidating, but with the right tools and guidance, you can save a significant amount of money by doing it yourself.
A radiator is critical for keeping your engine cool, and when it fails, it can lead to overheating and expensive repairs. Here’s a step-by-step guide to help you replace your car’s radiator like a pro.
Why Might You Need to Replace Your Radiator?
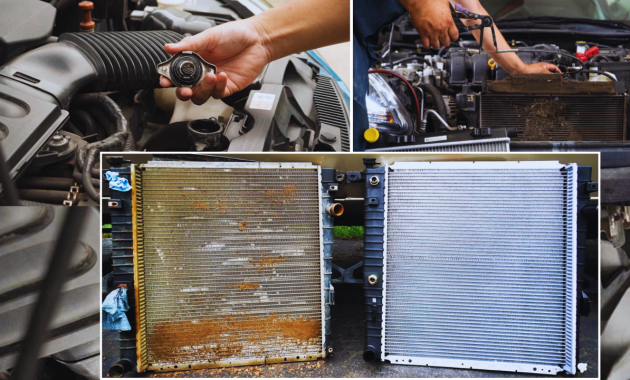
Over time, radiators can develop leaks, become clogged, or corrode. Common signs that your radiator needs replacing include:
- Overheating engine
- Coolant leaks under the car
- Rust or discoloration on the radiator
- Low coolant levels despite regular top-ups
- If you notice these symptoms, it’s time to inspect your radiator.
Tools and Materials You’ll Need
Before starting, gather the following tools and materials to ensure a smooth replacement process:
- A new radiator (compatible with your car’s make and model)
- Coolant
- Distilled water
- Drain pan
- Socket set and wrench
- Screwdrivers (flathead and Phillips)
- Hose clamps or pliers
- Safety gloves and goggles
- Shop towels or rags
Step-by-Step Guide
Step 1: Prepare Your Work Area
Start by parking your car on a flat surface and ensuring the engine is completely cool. Replacing a radiator on a hot engine is dangerous, as the coolant can be under pressure and cause burns. Disconnect the battery to prevent any electrical issues.
Step 2: Drain the Old Coolant
- Locate the radiator drain plug, typically at the bottom of the radiator. Place the drain pan underneath to catch the old coolant.
- Unscrew the drain plug or remove the lower radiator hose, allowing the coolant to flow into the pan.
- Dispose of the used coolant responsibly. Most auto parts stores accept old coolant for recycling.
Step 3: Remove the Radiator Hoses
Radiator hoses connect the radiator to the engine. Carefully remove both the upper and lower hoses:
- Use pliers or a screwdriver to loosen the hose clamps.
- Gently twist the hoses to break the seal and pull them off.
- Inspect the hoses for cracks or wear. If they’re damaged, replace them during this process.
Step 4: Disconnect Other Components
Depending on your car, you may need to disconnect additional components:
- Transmission Cooler Lines: If your vehicle is equipped with an automatic transmission, it may have cooler lines attached to the radiator. Use a wrench to disconnect these carefully.
- Fan Assembly: If the radiator fan is mounted on the radiator, unscrew and remove it.
- Sensors or Wires: Some radiators have attached sensors. Disconnect these by unplugging them.
Note: Take photos as you go to ensure you remember how everything reconnects.
Step 5: Remove the Old Radiator
Once everything is disconnected, remove the bolts or brackets holding the radiator in place. Lift the radiator out carefully to avoid spilling any remaining coolant or damaging nearby components.
Step 6: Install the New Radiator
Place the new radiator into the same position as the old one, aligning it with the mounting brackets.
Secure the radiator with bolts or brackets. Tighten them snugly but avoid overtightening, as this can damage the radiator.
Step 7: Reconnect Components
Work backward from the disassembly process to reconnect all the components:
- Reattach the radiator hoses and secure them with clamps.
- Connect the transmission cooler lines, if applicable.
- Install the fan assembly and reconnect any sensors or wires.
- Ensure all connections are tight to prevent leaks.
Step 8: Refill the Radiator with Coolant
- Mix the coolant with distilled water, following the ratio recommended in your vehicle’s manual (typically 50/50).
- Slowly pour the coolant mixture into the radiator until it’s full.
- Top up the coolant reservoir to the indicated level.
Step 9: Bleed the Cooling System
Air trapped in the cooling system can cause overheating. To remove it:
- Start the engine and let it run with the radiator cap off.
- Keep an eye on the coolant level, adding more if necessary.
- Watch for air bubbles escaping as the engine warms up.
- Once the bubbles stop, close the radiator cap.
Step 10: Test the New Radiator
- With everything reassembled, start the engine and let it idle.
- Check for leaks around the hoses, connections, and the radiator itself.
- Monitor the temperature gauge to ensure the engine stays within the normal operating range.
- Take the car for a short drive and recheck the coolant level afterward. Add more coolant if needed.
Additional Tips for a Smooth Replacement
- Double-check Compatibility: Ensure your new radiator matches your car’s make and model. A mismatched radiator can lead to installation problems.
- Inspect the Thermostat: While the cooling system is open, check the thermostat. If it’s old or faulty, consider replacing it to avoid future issues.
- Clean Surrounding Areas: Dirt and debris can accumulate around the radiator. Use a soft brush or compressed air to clean these areas before installing the new radiator.
When to Seek Professional Help?
If you encounter issues like stripped bolts, persistent leaks, or difficulty bleeding the system, it may be time to consult a mechanic. Professional help can ensure the job is done correctly, especially for complex vehicles.
You May Like To Read: How to Replace a Faulty Fuel Pump at Home.
Replacing your car’s radiator isn’t as daunting as it may seem. By following this step-by-step guide, you can confidently tackle the task and keep your engine running smoothly. Not only will you save money, but you’ll also gain valuable car maintenance skills. Always prioritize safety, take your time, and enjoy the satisfaction of a job well done!


